|
Note: The steel snare pictured on this page I did not use. It caused double triggering because metal transmits vibrations
much farther than wood (which absorbs it). I don't recommend using steel/brass.
Snare
|
This is the first snare attempt. I tried using a steel snare, and here it is stripped of hardware with its crossbar.
|
|
|
Another view of the snare.
|
|
|
After I learned steel snares aren't suitable for conversions, I transferred everything into my piccolo snare and came up with
this.
|
|
|
These pictures show the underside of the finished snare. You can see the rim piezo, which is double-stick taped onto the shell.
It is positioned like so:

By putting it as far as possible from the crossbar, I was able to keep crosstalk between the rim and the head minimal.
Also, I didn't find it necessary to use more than one rim piezo as the 2" ones were sensitive enough to trigger the whole
rim.
|
|
Toms
|
The
toms with their crossbars in. This picture includes the test steel snare, which isn't included in the final conversion.
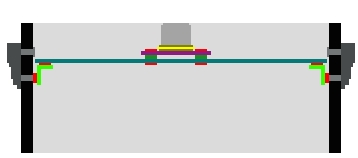
The
above diagram shows how I installed my tom and snare crossbars. I did not use a rim piezo on the toms.
Legend
Red: Rubber washers - Available in the sink repair section of your local Home Depot.
Lime green: L shaped aluminum strips - I bent small strips of aluminum and drilled
holes in them for L brackets.
Dark aqua: Aluminum U-channel (sides not shown) - The aluminum stripping fit snugly
into the U channel, forming a nice crossbar.
To cut the U channel easily, stick it in a chopsaw.
Dark green: Felt - Don't remember the exact name, but I used round pieces of felt to
cushion the cone platform.
Purple: Cone platform - Make this out of squares of plastic (which is how I did it),
thin wood, or something else which isn't
metal.
Yellow: Piezo element - I used 2" piezos for everything.
Gold: Double stick tape - 3M carpet tape from home depot. Look in the painting section.
Light gray: Cone - I made my own column-shaped cone of thick foam out of a small paint
roller. Big money saver when you compare
it to $9 for a Roland cone.
|
|
 Soldering was
actually a breeze. The piezo's leads are very small, so be careful you
don't mess up because stripping those wires are like trimming a spider's
fingernails :). Solder according to the diagram on the left.
Soldering was
actually a breeze. The piezo's leads are very small, so be careful you
don't mess up because stripping those wires are like trimming a spider's
fingernails :). Solder according to the diagram on the left.
|
|
|
After
soldering, the plug box was assembled by screwing a large hole in the end of the project box. I then put the quarter
inch stereo jack in place and tightened the nut.
The wires came out the other end of the project box via a small crevice in the
top of the bottom half of the project box.
When the lid went on, the wires neatly came out without big gaping holes.
|
|
|
...And
the final product - you have to do this four times for each drum. The plug box was attached by means of double stick
tape.
|
|
Sensitivity Troubleshooting
If you find your drum to not be sensitive enough, or rolls don't come out well, there are a few things you can check to improve
sensitivity.
|
| |
Sensitivity Setting
|
Cone's Amount of Contact with the head
|
| |
High
|
Low
|
| |
|
|
| |
Ideal
|
|
| |
|
|
| |
Low
|
High
|
|
Cone's Contact
As you can see, you want the best balance between the cone's contact and sensitivity setting. The best way to determine the
ideal height of the cone is to measure 1/4" above the rim of the shell, and make sure the cone is no higher. If your
sensitivity is off, play with the cone's contact.
Cone Placement
The cone should be isolated enough to provide sufficient rim/head separation. Make sure the only contact between the shell
and the crossbar is rubberized.
It's also a good idea to improve contact with the ceramic part of the piezo rather than the brass part. This will allow the
piezo to slightly bend the way it needs to, to properly absorb vibrations.
Other Tips
- Use a lot of solder. The vibrations caused by drumming will eventually break solder if not enough is used.
- Hot glue is your friend. Sand surfaces around whatever it is that you want to keep in place, then use nice big blobs.
- Only in rare cases should you apply a piezo directly to a surface.
|
|