|
|
 |
|
|
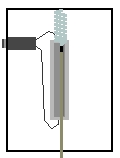
The hi hat was converted by attaching a project box with a slide potentiometer to my hi hat stand. The potentiometer was attached
to a spring, which was attached string, which was tied to the pedal.
Update
The spring ensured the pedal wouldn't cause damage to the potentiometer.
|
|
|
U bolts were attached through the lid of the project box. This way, you can remove the box much easier for testing. I used
1.5" U bolts but you should measure the diameter of your hi hat stand before purchasing. You want a tight fit because
the box can slide easily due to the constant up/down pressure on it.
|
|
|
Screw the project box to the lid, but be careful that your U bolts don't bother the 1/4" jack. You might need to cut
the bolt ends as I had to.
|
|
|
The final product is a VH...10? No, but very close to a VH-11. The one advantage over the 11 is you can choke it (I don't
know why you would ever need to though). Play with your module settings to achive the most realistic-feeling hat.
Update
I replaced the CY6 with a CY8 due to the CY6 having to leave with the sale of my old TD6 kit.
|
|
|
|
|
|
|
2006 Michael N. mikeMX3000@yahoo.com
WARNING:
Disclaimer - "There are No Guarantees to Your Personal Satisfaction. DO NOT ATTEMPT if you are NOT CONFIDENT
with your own abilities. [eDIY] cannot be held responsible for any damage to yourself, others, or equipment while attempting
any of the projects listed on these pages. Please use common sense, protective clothing and eyewear when obviously needed."
- RockOn4Ebay
|
|
|
|