|

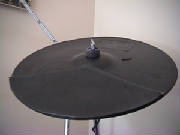
Pintech Practice Cymbal: Ride (16/18")
Simple, single-zone, non-chokable
For this conversion, I used:
(1) 16/18" Pintech Practice Cymbal - $16
(1) 2" Diameter Piezo Element - 75 cents each
(1) 1/4" Stereo Jack - 30 cents each
(1) 1' x 2' 3/16" Black Gum Rubber Sheet (available from mcmaster.com)
(1) Roll of electrical tape
(1) Small 4mm Black Wire-Tie
(1) Roll of 5mm foam tape (should be about 1.5" wide)
(1) Glue gun with glue (optional, helps jack to stay in place)
(1) 3M Spray Adhesive (Home Depot)
Instructions:
1) Lay the gum rubber sheet on one half of the cymbal. Cut according to the picture at the bottom.
2) Spray the spray adhesive on the gum rubber, then firmly apply to the practice cymbal.
3) Solder the piezo/jack assembly: Wire the 2" piezo on the head circuit, and the .6" piezo on the rim circuit.
4) Mount the piezos and the jack according to the picture at the bottom of the page. The .6" piezo can go anywhere
around the bell, but do not put anything between the piezo and the bell. You should, however, put some foam between the bow
piezo and the bow.
5) Tape over everything as desired.
6) Tweak the trigger settings in your module.
7) Congrats, you're done!

A 2" head-wired piezo is centered under the gum-rubber striking surface, while a .6" piezo is in the bell.
|

You should mount the piezo the same way on every cymbal: some double-stick tape, wire-tie, hot glue, and covered by electrical
tape.
|

The black wire-tie will look like this on the top of the cymbal.
|
<-- Cymbals
|

